

Building a (Personal) Relationship Manager with Notion API - Creating Your Node.js Application.
Notion API + Node.js as a Personal Relationship Manager


Introduction
We learned a bit about Notion, templates and integrations in the previous chapter of this series. In this part of the series, we would work on the building the Node.js application that interacts with our Contacts database.
Setting up Your Node.js Application
- Create a new folder called
notion-personal-relationship-managerandcdinto the folder. - Create a
.envand.gitignorefile at the root of the folder. - Add the
.envfile to a.gitignorefile. - Add your environment variables to the folder:
NOTION_AUTH_TOKEN={your-internal-integration-token-from-the-previous-step} PHONE_NUMBER_FOR_REMINDERS={the-phone-number-where-you-want-to-get-personal-reminders} - If you are using Twilio to follow along add the following environment variables too:
TWILIO_ACCOUNT_SID={your-twilio-account-sid} TWILIO_AUTH_TOKEN={your-twilio-auth-token} TWILIO_PHONE_NUMBER={your-twilio-phone-number}+symbol. - Using your command line interface, install the Notion JavaScript SDK
@notionhq/clientand dotenvyarn add @notionhq/client dotenv Create an index.js file and add the following lines of code to it
const dotenv = require("dotenv"); dotenv.config() console.log(process.env.NOTION_AUTH_TOKEN)- Run
node index.jsWe want to verify that our environment variables are loaded correctly. You should see your Notion API Key logged to the console.
Querying the Database.
We need to write queries to the database to extract information from it. We would not be interacting directly with the API links. Instead, we will be using the client generated from the SDK we installed.
Setting up the client
We need to set up our notion client in our app. Add the code below to your index.js
//...
const { Client } = require("@notionhq/client");

//...
const notionClient = new Client({
    auth: process.env.NOTION_AUTH_TOKEN
});
We created a notionClient variable which is an instance of the Client class from notion. This client is what we will use to interact with our database from our application.
Getting Data from Our Contacts Database.
To get our contacts from our database we need to database query endpoint. Since we are using the SDK the logic has been abstracted away and we get this wrapper that we can use. Add the following code to the index.js file.
(async () => {
    const response = await notionClient.databases.query({
        database_id: process.env.NOTION_DATABASE_ID
    });

    console.log(response);
})()
We created an async Immediately Invoked Function Expression IIFE. In that function, we create a variable called response. The response variable stores the response received when the promise from the databases.query call resolves. The databases.query method from the notionClient instance receives a JavaScript object as a parameter. In that object you can specify things like the id of the particular database you want to retrieve as well as filters to drill than and get specific items from the database.
Run node index.js on your command line. You should see an object that looks like this:
{
  object: 'list',
  results: [
    {
      object: 'page',
      id: '280af4da-82e9-4672-91df-86a45cc07015',
      created_time: '2022-08-17T19:59:00.000Z',
      last_edited_time: '2022-08-17T19:59:00.000Z',
      created_by: [Object],
      last_edited_by: [Object],
      cover: null,
      icon: null,
      parent: [Object],
      archived: false,
      properties: [Object],
      url: 'https://www.notion.so/Philip-Falconbridge-280af4da82e9467291df86a45cc07015'
    },
    //...
  ],
  next_cursor: null,
  has_more: false,
  type: 'page',
  page: {}
}
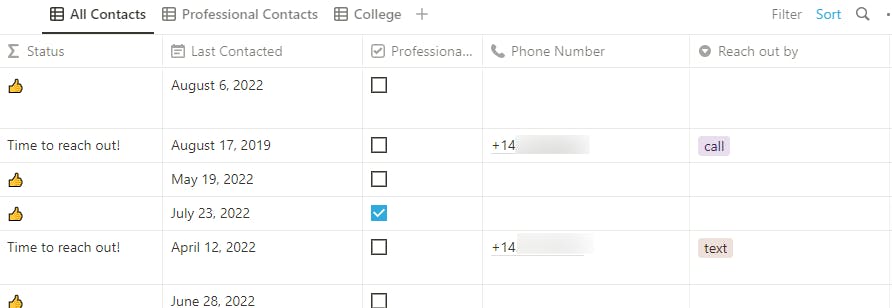
The results key is an array of objects containing the demo information that came with the database. At this point feel free to modify the data in the Notion web interface with personal contacts and their phone numbers. I have set the last contact date for two contacts to days within the last 3 months. I have also included phone numbers for them. Finally, I set the Reach out by field as shown below:
Applying Filters to Get Contacts that Have not Been Contacted in 3 Months
We need to add the filters key to the options object we passed to the Notion client method. Recall that we created a property called 'Should Reach Out?'. That is what we are going to use to filter our results to retrieve just the contacts that we have not contacted in 3 months. Make the following changes to your code in index.js
 const response = await notionClient.databases.query({
        database_id: process.env.NOTION_DATABASE_ID,
        filter: {
            property: "Should Reach Out?",
            checkbox: {
                equals: true,
            },
        },
    });
The Should Reach Out? property generates a checkbox-like outcome. We checked to see if the checkbox for that property is true. Doing this would ensure that the client returns only those rows where that Should Reach Out? property is ticked.
When I run my code, I get only 2 objects in the results array in the contacts variable. However, the object doesn't seem to contain what we need yet. How do we get the phone number and the method of reaching out to these two individuals?
Drilling Further into The Response to Get What We Need
The query endpoint returns a list of pages in the database. We need to extract the additional details or 'properties' for each page by using the Retrieve a page property endpoint. The _extractContactDetails method below shows us how to do that.
const _extractContactDetails= async (filteredContactsArray) => {
    let details;
    if (filteredContactsArray) {
        const neededPageAndPropertiesIds= filteredContactsArray.map((contactObject) => ({
            pageId: contactObject.id,
            phoneNumberPropertyId: contactObject.properties['Phone Number'].id,
            namePropertyId: contactObject.properties['Name'].id,
            reachOutByPropertyId: contactObject.properties['Reach out by'].id
        }))

        const promises = neededPageAndPropertiesIds.map(async (pageAndPropertyId) => {
            const { pageId, phoneNumberPropertyId, namePropertyId, reachOutByPropertyId } = pageAndPropertyId;

            const phoneNumberProperty = await notionClient.pages.properties.retrieve({
                page_id: pageId,
                property_id: phoneNumberPropertyId
            });

            const reachOutByProperty = await notionClient.pages.properties.retrieve({
                page_id: pageId,
                property_id: reachOutByPropertyId
            });

            const nameProperty = await notionClient.pages.properties.retrieve({
                page_id: pageId,
                property_id: namePropertyId
            });

            return {
                phoneNumber: phoneNumberProperty.phone_number,
                reachOutBy: reachOutByProperty.select.name,
                name: nameProperty.results[0]?.title.text.content
            };
        })

        details = await Promise.all(promises);
    } else {
        throw new Error('You did not provide any list to extract data from.');
    }

    return details;
};
The _extractContactDetails function is an async function that receives the filtered contact results from the response we get. If that parameter is null, we want to throw an error and not proceed any further. We will cover error handling in a later section. Pages and properties have ids associated with them. We loop through each contactObject in filteredContactsArray. Then return an object with pageId, phoneNumberPropertyId, namePropertyId and reachOutByPropertyId key corresponding to the page id and the ids for the Phone Number, Name and Reach out by' properties respectively for each contactObject.
Next, we loop through the array returned and for each set of ids, we call the pages.properties.retrieve method. This method is a wrapper provided by the client that calls the 'Retrieve a page property' endpoint. It returns an array of promises that we simply called promises.
Using Promise.all, we aggregated the result of these promises. Finally, we returned the details variable.
The next step is update our IIFE function to use this method.
(async () => {
    //..
    const details = await _extractContactDetails(response.results);
    console.log(details)
})()
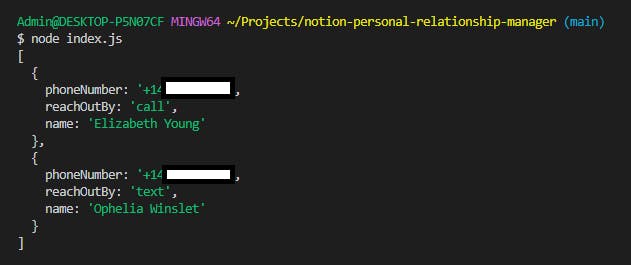
On re-running index.js, you will see a nice compact array of object showing the name, phone number and contact method of the two individuals that match the criteria we set earlier.
Handling Errors
We need to catch and manage any errors that the client throws. The Notion client rejects with a APIResponseError object. We can add a try-catch block at the top level of our application to catch any errors that happens when we query the database.
(async () => {
    try {
        const response = await notionClient.databases.query({ ... });
        const details = await _extractContactDetails(response.results);
    } catch (error) {
        console.error(error)
    }
})()
The error object contains several properties from the API response, one of which is a key called code. Notion also provides an APIErrorCode object that stores key-value pairs of the different error codes and their corresponding string values. You can find a list of the different possible error codes here.
For now, we just want to check that the error we get is an instance of APIResponseError. If it is we log some messages saying it is from the API. If it is not, we log the message of the error.
//...

const { Client, APIResponseError } = require("@notionhq/client");

//...

(async () => {
    try {
        //...
    } catch (error) {
       if (error instanceof APIResponseError) {
            console.error("Unable to fetch items from database. An error occured from the API client.")
            console.error("Error code: " + error.code)
            console.error(error.message)
        } else {
            console.error(error.message)
        }
    }
})()
You can try this out by changing your database id to some made up value. You will get a warning message from the client as well as the specified messages on the console.
Sending Reminders to Call and 'Checking in' Messages.
Now that we have the details of our contacts that meet those criteria, we need to implement the logic to send either a reminder to call to ourselves or a send a casual check in message.
In the try block in the IIFE block , add the following control flow statements:
const details = await _extractContactDetails(response.results);
for (let detail of details) {
     if(detail.reachOutBy === 'text') {
         console.log('Text')
     }  else {
          console.log('Just call')
     }
};
If the reachOutBy option is equal to 'text', we want to send some message to the person. If it is 'call' or null, we want to send an SMS reminder to ourselves to make that call. If it is neither, we want to remind ourselves to call.
Let us create a helper function called _sendSMS.
If you want to use Twilio and at this point, you do not have the Twilio SDK installed, you can install it by running yarn add twilio.
In the index.js file, create an instance of the Twilio client at the top of your file. Add the __sendSMS function and call it as shown below.
const twilio = require('twilio')
const RestException = require('twilio/lib/base/RestException')

//...

const twilioClient = twilio(process.env.TWILIO_ACCOUNT_SID, process.env.TWILIO_AUTH_TOKEN);

//...

const _sendSMS = async (phoneNumber, messageBody) => {
    return await twilioClient.messages
      .create({body: messageBody, from: process.env.TWILIO_PHONE_NUMBER, to: phoneNumber});
}

(async () => {
    try {
        //...

        const details = await _extractContactDetails(response.results);
        for (let detail of details) {
            const { name, reachOutBy, phoneNumber } = detail
            let response;

            if(reachOutBy === 'text') {
                const checkInMessage = `Hi ${name}! How have you been? It has been a while and I wanted to say hi. Let's catch up soon. Have a great day!`;
                response = await _sendSMS(phoneNumber, checkInMessage)
            }  else {
                 console.log('Just call')
            }
        };
    } catch (error) {
        if (error instanceof APIResponseError) {
            // ...
        } else if (error instanceof RestException) {
            console.error('Unable to send reminder or message. The following error occured: ');
            console.error(error.message)
        } else { //... }
    }
})()
We are returning the response and logging parts of it to our console. We also catch errors of RestException type and log out a specific message relating to sending messages.
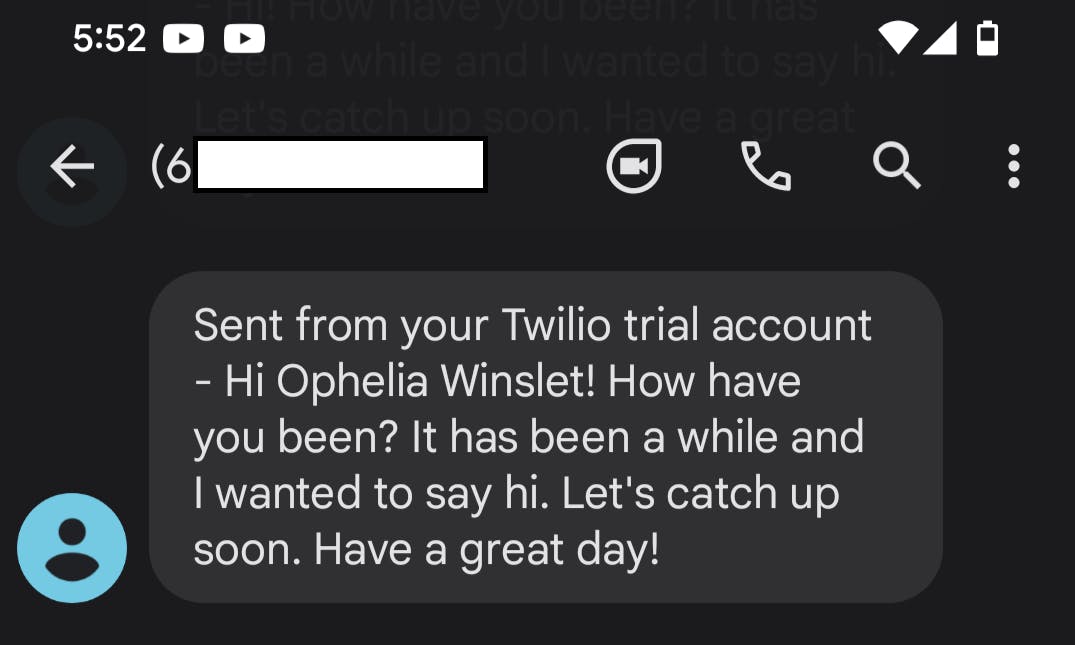
Run node index.js. If your SMS messaging service with Twilio or any other provider has been setup correctly, you should get a message on your mobile phone that looks like this:
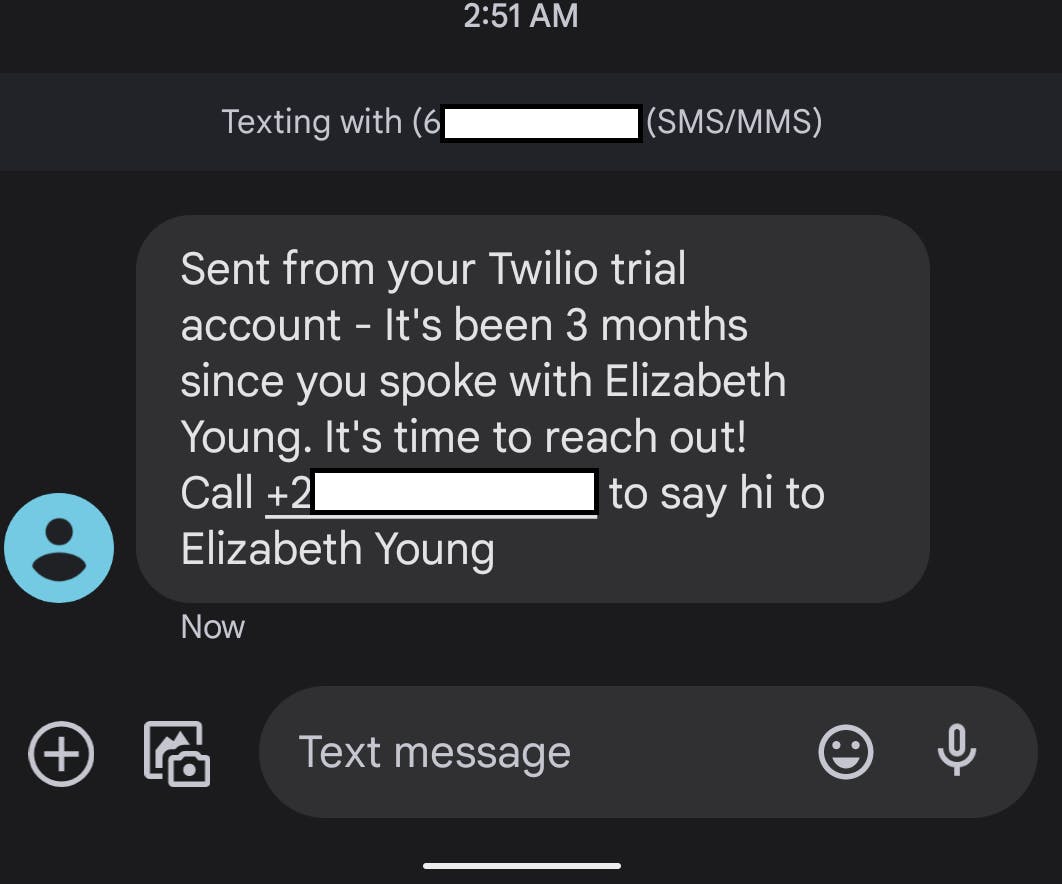
We want to repeat the same thing for contacts that we want to call.
else {
    const reminderMessage = `It's been 3 months since you spoke with ${name}. It's time to reach out! Call ${phoneNumber} to say hi to ${name}`
    response = await _sendSMS(process.env.PHONE_NUMBER_FOR_REMINDERS, reminderMessage)
}
The difference is that we are using the phone number we added to our .env that is designated for receiving the reminders.
When you re-run the index.js file, you should get the same outcome as before.
Conclusion
At this stage, we can now send reminders to ourselves or messages to our contacts by running the index.js file. However, that is not very exciting.
In the next part of the series, we will discuss the final glue that holds this project together - automation.